In a previous post, I explained how to run RStudio on the compute nodes of the HPC. I am going to continue on this theme and explore some of the interesting side effects of running RStudio in a High Performance Computing environment.
This post assumes you are running all of the following code in an RStudio container on the HPC. Specifically, you must be using a container image that has the PBS commands wrapped in ssh commands (explained below).
Motivation
Imagine we want to do some data exploration and initial analysis. However, we are unsure of what computational resources we will require. We can request a large number of resources when we submit our RStudio container to the HPC. That way we will have the resources we need when we need them. However, as most of our work will be to understand our data and not run intensive analyses, most of these resources will be wasted.
Typical when we are working on the HPC we request resources per job and submit that to the queue. So why don’t we do that in our RStudio sessions? In the ideal scenario, we can request resources per chunk in our notebook. Thus, we can request resources only when we need them.
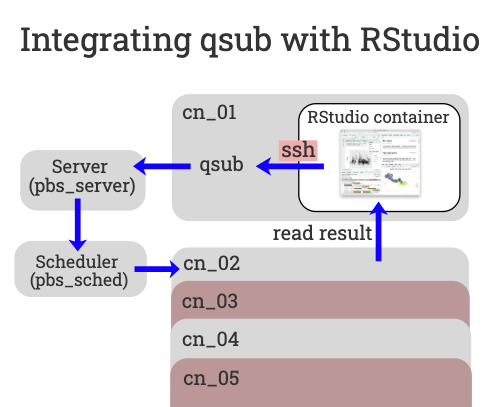
To make this possible we need to submit jobs to the queue using qsub from inside the container. However, there is one problem, qsub (and the other PBS commands) are not accessible from within the container. We need a way to talk to the PBS server from within the RStudio container so we can submit jobs to the queue with variable resources.
The solution is to wrap the PBS commands in an ssh command. That way, when we want to execute qsub from within the container the command is actually ssh’d out of the container. This code is already in the RStudio container recipe file. When the container is built a fake qsub command is created within the container for your use.
The fake qsub command sends an ssh command out of the container before calling the real qsub that submits the user defined code back into the queue to run on a different (or the same) compute node. Finally, the results are then read back into the starting container via the shared file system.
Calling qsub from bash
Lets see how this works in practice. We’ll build our way up to a workable solution starting with a simple bash command.
# make a bash script
echo "#!/bin/bash
echo \"Hello World\"" > myscript.sh

# submit to qsub / redirect output to current dir
qsub -o $(pwd) $(pwd)/myscript.sh
# returns a job ID
>>> 1579438.jobmgr1
The qsub command used here is actually the ssh wrapper script from above. The fake qsub is taking the arguments and sending them to the real qsub via ssh. Because we redirect output to current directory we can read in the results once the script finishes running in the queue.
We can streamline the process by piping the commands directly into qsub.
# submit to qsub using pipe / redirect output to current dir
echo "echo \"Hello World\"" | qsub -o $(pwd)
Calling qsub from R
The code above must be run in a bash chunk in an RStudio markdown files. However, we can use R to submit qsub jobs and thus run them from regular R chunks.
# change to current dir and run `ls`
cd_current_dir <- paste("cd", getwd())
cmd <- paste(cd_current_dir, 'ls', sep = ' && ')

# the command defined above is inserted into the submission pipeline code
qsub_cmd <- sprintf('echo "%s" | qsub -o $(pwd)', cmd)

 # call bash command with R
qsub_id <- system(qsub_cmd, intern = TRUE)
qsub_id
>>> [1] "1579441.jobmgr1"
Now we can submit jobs, but we still need to read the results back into R.
reading results into R
We can read the job output file into R using the readLines function. However, because the output file is not create until the job completes we must wait for it to be created first.
cmd <- "
echo hello
echo world
echo hello
echo world
"

# call qsub from R and set the output dir to the current dir
qsub_cmd <- sprintf('echo "%s" | qsub -j oe -o %s', cmd, getwd())
qsub_id <- system(qsub_cmd, intern = TRUE)

# we know what the outfile will look like and where it'll be...
outfile <- paste0(qsub_id, ".OU")

# so we wait for the outfile to be created
while (!file.exists(outfile)) {
  Sys.sleep(1)
}

# once it's created we read the outfile into R
output <- readLines(outfile)

# clean up by removing the outfile
rm_outfile <- file.remove(outfile)

output
>>> [1] "hello" "world" "hello" "world"
writing a R qsub function
The above code can be generalised into a function. This qsub function allows you to wrap code that should be passed to the qsub command and run on a compute node.
qsub <-
  function(cmd,
           qsub_prams = "",
           run_dir = getwd(),
           outfile_dir = getwd(),
           remove_outfile = TRUE,
           sleep_time = 1) {
    cd_dir <- paste("cd", run_dir)
    cmd <- paste(cd_dir, cmd, sep = ' && ')
    qsub_cmd <-
      sprintf('echo "%s" | qsub %s -j oe -o %s', cmd, qsub_prams, outfile_dir)
    qsub_id <- system(qsub_cmd, intern = TRUE)
    outfile <- paste0(qsub_id, ".OU")
    while (!file.exists(outfile)) {
      Sys.sleep(sleep_time)
    }
    output <- readLines(outfile)
    if (remove_outfile) {
      rm_outfile <- file.remove(outfile)
    }
    output
  }
This function provides a simple interface for submitting jobs from within RStudio on the HPC.
cmd <- "echo hello world"
qsub(cmd)
The qsub function has a qsub_prams argument. This means that we can request resources on a per-function call basis and the request will be passed to the real qsub command.
qsub(cmd, qsub_prams="-l select=1:ncpus=4:mem=8gb")
Blocking code
The problem with this solution is that R waits for each qsub function call to finish before running the next one. Each call blocks until its outfile is created, only then will the next call run.
cmd <- "
sleep 5
echo finished
"
system.time({
  qsub(cmd)
  qsub(cmd)
  qsub(cmd)
})
#
>>> user  system elapsed
0.109   0.108  18.677
To take full advantage of the HPC we want each command to run in parallel.
Running qsub in background jobs with RStudio
There are a few ways to run code at the “same” time in R. One example is using the background jobs feature. We do this by saving the qsub function we want to run into a RScript file and then running that file as a job. Using the importEnv and exportEnv args we can make sure our job runs with our environment and that the results are automatically added once the job completes.
# make a R script
echo "job2_res <- qsub(cmd)
" > qsub_job_script.R
# Use the rstudioapi to start the job (qsub_job_script.R) with a copy of the glob env and copy the result back to the global env.
job_id <- rstudioapi::jobRunScript(path = "qsub_job_script.R", importEnv = TRUE, exportEnv = 'R_GlobalEnv')
Running qsub in background jobs with parallel
A more practical solution to the blocking problem is to use the parallel library. With parallel::mcparallel you can evaluate an R expression asynchronously in a separate process.
library(parallel)
pid1 <- mcparallel(qsub(cmd))
pid2 <- mcparallel(qsub(cmd))
pid3 <- mcparallel(qsub(cmd))
All of these calls run instantly, however, they do not return the result of the qsub function. Instead, the mcparallel function returns a PID (process ID) for each job. The PID can be used to collect the results once they are finished.
While the processes are running you can do other things e.g. check the queue status.
>>> Job ID          Username Queue    Jobname    SessID NDS TSK Memory Time  S Time
--------------- -------- -------- ---------- ------ --- --- ------ ----- - -----
1579407.jobmgr1 jc220896 short    r_studio   107753   1   4    8gb 24:00 R 00:35
1579434.jobmgr1 jc220896 short    STDIN      138182   1   1    8gb 12:00 R 00:00
1579435.jobmgr1 jc220896 short    STDIN      138183   1   1    8gb 12:00 R 00:00
1579436.jobmgr1 jc220896 short    STDIN      138184   1   1    8gb 12:00 R 00:00
When you need the results you can call the mccollect function on each of the PIDs. The mccollect function will block until all of the qsub function calls are ready to return. However, they will all continue to run in parallel.
system.time({
res <- mccollect(list(pid1, pid2, pid3))
})
res
>>> user  system elapsed
0.094   0.119   5.995
$`194100`
[1] "finished"

$`194106`
[1] "finished"

$`194113`
[1] "finished"
Parallel qsub function
We can improve the qsub function so that mcparallel will be called each time. The new qsub function will not block until the results are collected.
parallel_qsub <-
  function(cmd,
           qsub_prams = "",
           run_dir = getwd(),
           outfile_dir = getwd(),
           remove_outfile = TRUE,
           sleep_time = 1) {
    cd_dir <- paste("cd", run_dir)
    cmd <- paste(cd_dir, cmd, sep = ' && ')
    qsub_cmd <-
      sprintf('echo "%s" | qsub %s -j oe -o %s', cmd, qsub_prams, outfile_dir)
    qsub_id <- system(qsub_cmd, intern = TRUE)
    outfile <- paste0(qsub_id, ".OU")

    # move mcparallel inside qsub
    output_pid <- mcparallel({
      while (!file.exists(outfile)) {
        Sys.sleep(sleep_time)
      }

      output <- readLines(outfile)
      if (remove_outfile) {
        rm_outfile <- file.remove(outfile)
      }
      output
    })
    output_pid
  }
This improves the interface for submitting jobs to the HPC.
pid1 <- parallel_qsub(cmd)
pid2 <- parallel_qsub(cmd)
pid3 <- parallel_qsub(cmd)

res1 <- mccollect(pid1)
res2 <- mccollect(pid2)
res3 <- mccollect(pid3)
future
Finally, we can use the package future to write non-blocking code with many different backends.
install.packages("future")
We can use a multisession plan to run multiple R sessions at the same time.
library(future)
# setting the plan takes sometime to spin up the other R session but it only has to run once
plan(multisession)
The qsub function call can be wrapped in implicit futures (v %<-% {}), they will only block when the value is queried.
cmd <- "
sleep 5
echo finished
"

# implicit futures calls run in the background
res1 %<-% {
  qsub(cmd)
}

res2 %<-% {
  qsub(cmd)
}

res3 %<-% {
  qsub(cmd)
}
When required the values can be queried. They will only block if they haven’t finished running.
>>> [1] "finished"
[1] "finished"
[1] "finished"
An explicit future version of the qsub function can be created by wrapping the blocking code in the function with the future::future function.
future_qsub <-
function(cmd,
qsub_prams = "",
run_dir = getwd(),
outfile_dir = getwd(),
remove_outfile = TRUE,
sleep_time = 1) {
cd_dir <- paste("cd", run_dir)
cmd <- paste(cd_dir, cmd, sep = ' && ')
qsub_cmd <-
sprintf('echo "%s" | qsub %s -j oe -o %s', cmd, qsub_prams, outfile_dir)
qsub_id <- system(qsub_cmd, intern = TRUE)
outfile <- paste0(qsub_id, ".OU")
# move future inside qsub
output_future <- future({
while (!file.exists(outfile)) {
Sys.sleep(sleep_time)
}
output <- readLines(outfile)
if (remove_outfile) {
rm_outfile <- file.remove(outfile)
}
output
})
output_future
}
The future_qsub function runs the code in the background and returns a future.
fut1 <- future_qsub(cmd)
fut2 <- future_qsub(cmd)
fut3 <- future_qsub(cmd)
fut1
>>> MultisessionFuture:
Label: ‘<none>’
Expression:
{
while (!file.exists(outfile)) {
Sys.sleep(sleep_time)
}
output <- readLines(outfile)
if (remove_outfile) {
rm_outfile <- file.remove(outfile)
}
output
}
Lazy evaluation: FALSE
Asynchronous evaluation: TRUE
Local evaluation: TRUE
Environment: <environment: 0x55d6e80a5b58>
Capture standard output: TRUE
Capture condition classes: ‘condition’
Globals: 3 objects totaling 248 bytes (character ‘outfile’ of 136 bytes, numeric ‘sleep_time’ of 56 bytes, logical ‘remove_outfile’ of 56 bytes)
Packages: <none>
L'Ecuyer-CMRG RNG seed: <none> (seed = FALSE)
Resolved: FALSE
Value: <not collected>
Conditions captured: <none>
Early signaling: FALSE
Owner process: e2c28bcd-ac2d-dec8-96c8-1585b116328b
Class: ‘MultisessionFuture’, ‘ClusterFuture’, ‘MultiprocessFuture’, ‘Future’, ‘environment’
We can use the future::value function to get the value from a future.
res1 <- value(fut1)
res2 <- value(fut2)
res3 <- value(fut3)
res1
res2
res3
>>> [1] "finished"
[1] "finished"
[1] "finished"
Conclusions
We have seen a variety of methods to submit qsub scripts to the compute nodes from within our RStudio session on the HPC. However, the way we are submitting jobs here is still not optimal. We are submitting bash commands to qsub that then run on HPC, but ideally we want to submit R code. There are several solutions to this problem that I will elaborate in a future post (e.g. templates, container proxies, batchtools). For now, check out future.batchtools. Using future.batchtools you can seamlessly run R code on compute nodes without the hacky bash workaround found above. This allows you to do things like render plots in a job.
]]>